Getting Started with three.js
Updated
•3 min readStep 1: Basic HTML Structure
We require a three.js file that can be imported using the CDN.
<!DOCTYPE html>
<html lang="en">
<head>
    <meta charset="UTF-8">
    <meta http-equiv="X-UA-Compatible" content="IE=edge">
    <meta name="viewport" content="width=device-width, initial-scale=1.0">
    <title>Torus-Normal Mesh</title>
    <script src="https://cdnjs.cloudflare.com/ajax/libs/three.js/r128/three.min.js" integrity="sha512-dLxUelApnYxpLt6K2iomGngnHO83iUvZytA3YjDUCjT0HDOHKXnVYdf3hU4JjM8uEhxf9nD1/ey98U3t2vZ0qQ==" crossorigin="anonymous" referrerpolicy="no-referrer"></script>
    <style>
        body {
            margin: 0;
            padding: 0;
            overflow: hidden;
        }
    </style>
</head>

<body>
    <div id="Renderer-Output"></div>
    <script>
        function initialize() {
            // here
        }
        window.onload = initialize;
    </script>
</body>
</html>
Step 2: Setup Camera, Scene & Renderer
Create variables for Scene(), PerspectiveCamera()& WebGLRenderer().
- Scene is used to add cameras, object and lights.
- PerspectiveCamera constructor accepts 4 values
fov, aspectRatio, nearPoint, farPoint. fovis the angle from bottom to top in degrees, called as "Camera Frustum vertical Field of View". Default: 50aspectRatiois the ratio of canvas width and canvas height, called as "Camera Frustum aspect ratio". Default: 1 In the Below code the Ratio is changed towindow.innerWidth/window.innerHeight.nearPointis the the nearest plane that the camera can capture, it is called "Camera frustum near plane". Default: 0.1farPointis the farthest plane that the camera can capture, it is called "Camera frustum far plane". Default: 2000- We should have
nearPoint < farPointalways. camera.position.xsets the x coordinate of camera position to the value -30.camera.lookAt(scene.position)points the camera to the scene position here, (0, 0, 0).scene.add(camera)adds the camera to the Scene, every object/camera/light that we want to render on the browser must be added to the Scene.WebGLRendereruses WebGL to Render the Scene.renderer.setClearColor(color : Color, alpha : Float )sets the color and the opacity/alpha of the Webpage Background.Colorcan be used in many ways.- We can pass the RGB values as String, for example:
THREE.Color("rgb(255, 0, 0)")orTHREE.Color(255, 0, 0). - Also HSL values as String for example:
THREE.Color("hsl(0, 100%, 50%)"). - But HexaDecimal Color codes are more preffered for example:
THREE.Color(0xEEEEEE). renderer.setSize(width: Integer, height: Integer)sets the Size of canvas to the mentioned width and height. For example: In the below code we have set it towindow.innerWidthandwindow.innerHeight.
var scene = new THREE.Scene();
var camera = new THREE.PerspectiveCamera(50, window.innerWidth / window.innerHeight, 1, 1000);
camera.position.x = -30;
camera.position.y = 30;
camera.position.z = 30;
camera.lookAt(scene.position);
scene.add(camera);
var renderer = new THREE.WebGLRenderer();
// Create and add objects/lights/camera to Scene
renderer.setClearColor(new THREE.Color(0xEEEEEE), 1.0);
renderer.setSize(window.innerWidth, window.innerHeight);
Step 3: Add Geometries and Materials
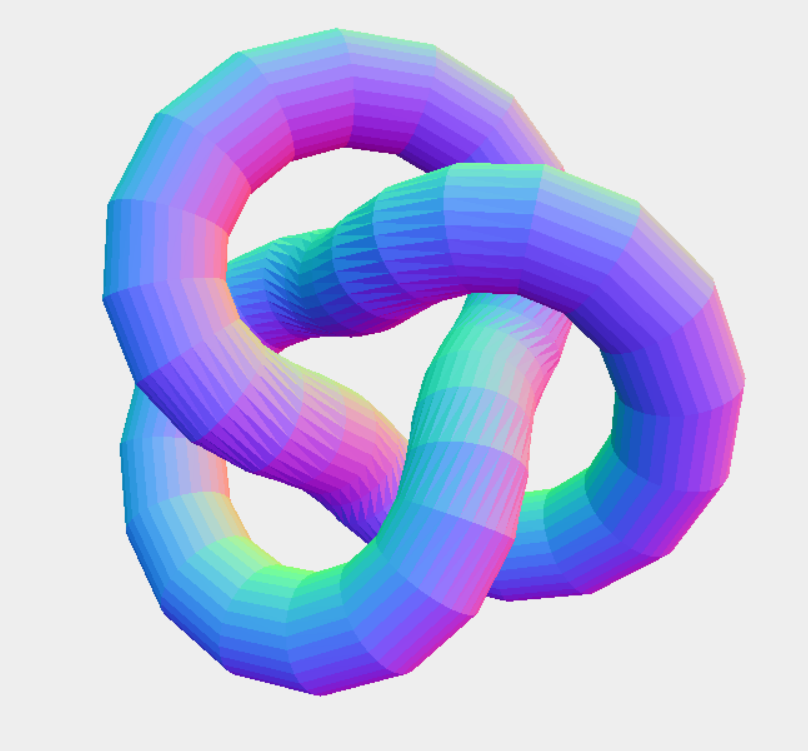
TorusKnotGeometry(radius : Float, tube : Float, tubularSegments : Integer, radialSegments : Integer, p : Integer, q : Integer)creates a Torus Geometry.pis the integer that determines the number of times the geometry winds around its axis of rotational symmetry. Default: 2qis the integer that determines the number of times the geometry winds around a circle in the interior of the torus. Default: 3MeshNormalMaterial(parameters: Object)creates a Material that maps normal Vectors to RGB Colors.Mesh( geometry : BufferGeometry, material : Material )creates a Mesh from Geometry and Material.
const geometry = new THREE.TorusKnotGeometry(10, 3, 50, 30);
const material = new THREE.MeshNormalMaterial({flatShading: true});
const torusKnot = new THREE.Mesh(geometry, material);
scene.add(torusKnot);
// animate
Step 4: Animate The Object
requestAnimationFrame(animate)will tell the browser that you wish to perform an Animation. It take a callback as an argument. animate function is calling itself repeatedly.torusKnot.rotation.x += 0.1will rotate the object with respect to x axis by 0.01.renderer.render(scene, camera)will re-render the Scene in the animate function, overall it will create a scene with the rotating TorusKnot.
animate();

function animate() {
      requestAnimationFrame(animate);
      torusKnot.rotation.x += 0.01;
      torusKnot.rotation.y += 0.01;
      torusKnot.rotation.z += 0.01;
      renderer.render(scene, camera);
}
Output will be:
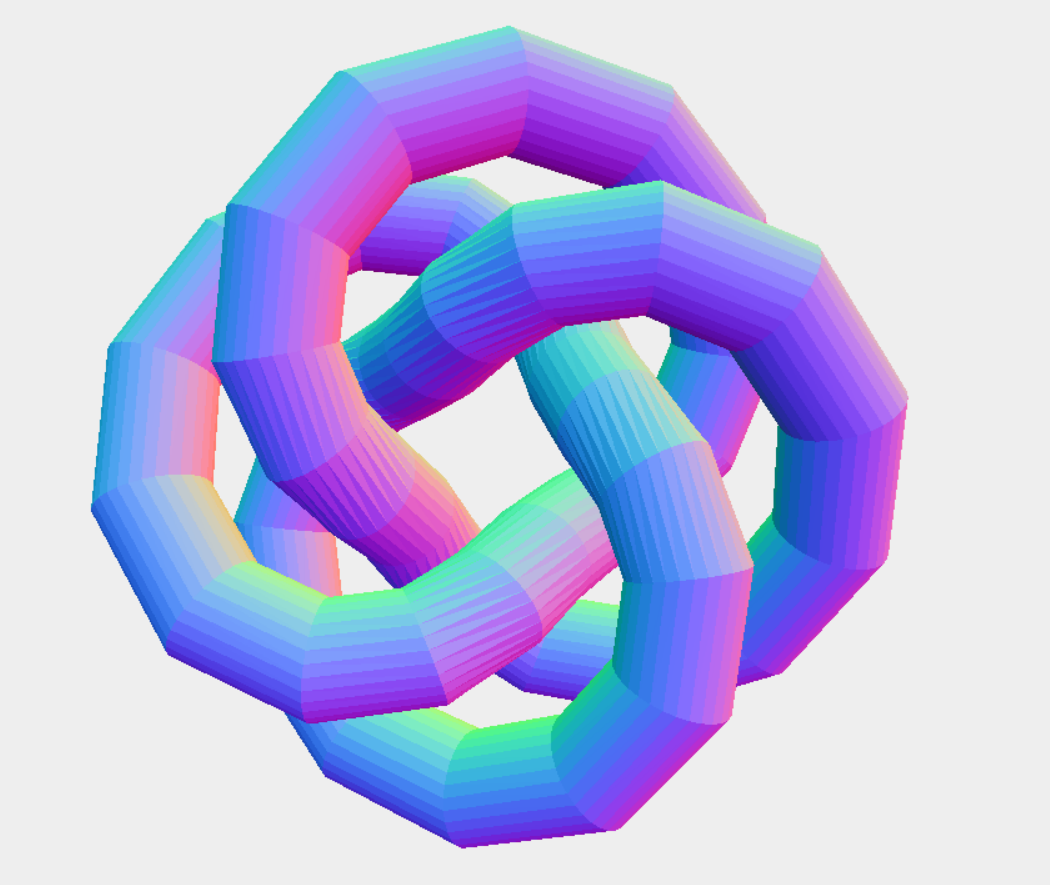
- Try passing arguments as
THREE.TorusKnotGeometry(12, 3, 50, 30, 3, 4)and you will see a beautiful structure as below: